Showing posts with label tutorials. Show all posts

Wednesday, 26 October 2011

Shooting against the light

We've all been there...you are sitting at an awesome sighting, watching some beautiful animal or bird...but the light is just W-R-O-N-G...

Now you've got 2 options. Either you pack away the camera and just enjoy the sighting...or you try to work with the light you have and create some images that might come out better than you thought, or better yet, might come out a litte 'out-of-the-box'. In this post I will elaborate on some of these situations you might encounter, and also show some of the images I have been able to capture in similar cases which I thought came out okay.

The classic case is the "back-lit" image, where the light comes from directly opposite your viewing position and you have to use it to enhance the contours and outlines of your subject. The key here is to ensure you under-expose significantly to ensure you capture the mood and don't blow the highlights. You can either do this by manually adjusting exposure or exposure compensation bias and checking the histogram, or if you like to use your metering function apart from your focusing function you can meter off the brightest highlights.


Another angle of light we encounter in the field is a case of strong 'side-light'. In this case the light hitting the subject creates a stark contrast between one part of the subject and another. Obviously this is only possible in the early morning and late afternoon...no noon-time shots available here! The ideal exposure for me in cases like this is to obtain enough detail in the shaded parts without making it look unnatural and without blowing out the highlighted areas.


The key to facing a situation where the light is challenging, is to know your equipment well, know how to use your exposure bias setting to achieve an over- or underexposed shot, and think creatively...in the end the best images are formed in your mind's eye before you even trip the shutter.

We all want those moments of "perfect" light, but they seldom are perfect...my advice would be to make the most out of the situations you do find yourself in when you are out in the field. Most of us have so precious little time to spend in the field to begin with!

Here are some more images I have been able to capture in these kinds of light.


Till next time!

Morkel Erasmus


Sunday, 3 July 2011

OVERWHELMING: The power of panoramic presentation

Hey everyone...

I did a rework this week of an old photo...you know how that goes, right? You progress in your photography and your post-processing skills, and you think: "hey, remember that photo I captured at ______ last ______? (fill in the blanks) Let's see what it looks like now."

In this case it wasn't so much a new processing skill I learned, but that I realised after browsing through the particular shoot's thumbnails that I realised I had taken alternative compositions of this scene. With the advent of digital imaging we tend to sometimes just click the shutter as many times as we can at as many perspectives possible to make sure we make the most of the scene...the problem is we end up forgetting exactly what we shot and why we did so.

The original is of a lonely tree (cliche, right?) overwhelmed by some building cumulus clouds over the South African Highveld. I titled the photo - you guessed it - OVERWHELMING. The original perspective was shot using the Canon 100-400mm zoom lens, at a focal length of 105mm (thus nearly as wide as I could go with this lens).

100mm focal length  |  single image  |  slight crop from the top

Just for overall perspective, here is the same scene (albeit with a cooler white balance setting) shot at 22mm. This is close to how the human eye perceives the scene (at 35mm focal length equivalent). 


22mm focal length  |  single image  |  no crop


Now, going back to the folder I remembered that I had also used the 105mm focal length setting in the first post on this scene and shot a few consecutive frames with the view of stitching them together as a panorama one day. That day came last week. I opened up the 3 consecutive shots in Photoshop in order to stitch them together using the "Photomerge" command. Now it goes without mention that the final stitched image not only provides a "grander sweep" of the scene, but also has a much higher resolution than I could have achieved with a single image...this makes it easy to print it BIG

I also went for a darker, moodier feel...converting to black and white with a red filter to bring the most out of the blue sky (that tip is for free!). The only crop I applied was to remove the "white edges"...after compiling a panorama the image is usually left with some white edges where the image had to be straightened to fit the next image perfectly.


105mm focal length  |  3 images stitched together  |  crop to remove white edges
This kind of image unfortunately doesn't display well on a blog format where the maximum image width is constrained. You can view a larger version on my 500px profile here

I don't have a larger version than the 500px version online yet...so watch this space.


I would love your feedback. Which one works better for you, and why???


Cheers, till next time...


Morkel Erasmus


Friday, 29 April 2011

How LOW can you go???

Everybody who knows anything remotely significant about wildlife and bird photography will tell you how important it is to get eye contact with your subject. In a previous post I expanded on why and when I think there are times when you can break this "rule"...but in most cases the saying rings true.

I want to add to this: eye-contact at the subject's eye level is just as important!

The problem we often have to face, whether we are on a self-drive safari or on a game-viewing vehicle on a guided safari, is that we are just too high to get a real meaningful perspective on smaller subjects. Placing the photo on the subject's eye level adds a lot of impact, poignancy and "relevance" to a photograph...it allows the viewer to really connect with your subject. Because, let's be honest, many photos out there look like they could have been taken in any zoo or animal compound because of the "unnaturally" high angle of the shot. Like I said above, this is not always possible (you wouldn't want to get out and lie down in front of a close approaching lion now would you?)...but when it is at all possible to do so safely and without causing undue distress to the animal or bird...try it!

I'll give you a quick example. Below are 2 photos I captured of ground squirrels in the Kgalagadi Transfrontier Park (albeit not on the same trip). The first one was a very cute baby which I had to snap from the car window at an angle that is not a deal-breaker, but less-than-ideal in any case.

f8.0  |  1/250 SS  |  ISO-200


In the next photo I was in the Twee Rivieren rest camp in the Kgalagadi Transfrontier Park lying flat on my stomach to photograph these ground squirrels who were busy scrounging for a morsel in the unforgiving Kalahari sands. The lower angle really makes a big difference in placing the viewer in the scene, even though the mathematical difference in viewing "angle" here is probably not that much.

f7.1  |  1/640 SS  |  ISO-400

Many times the topography of the land will actually assist you in getting that ideal angle without you having to go through the extra effort! A case in point: observe the pictures of the following 2 lions. I digress they were photographed in completely different settings, but alas, this is to illustrate the point. This large male was photographed in the Madikwe Game Reserve from a game-viewing vehicle. Most of you who've been on safari in Africa will have a similar shot. It's stock standard. The light wasn't ideal, so I used a bit of flash.

f8.0  |  1/100 SS  |  ISO-400

The 2nd lion was a lioness we spent some time with in the Kgalagadi Transfrontier Park. She and the rest of her pride were just waking up at dusk after their afternoon nap and were getting ready for the night's hunting. She was lying on an incline of a dune, which made a very unique angle possible, even from the window of the SUV we were driving at the time.

f5.6  |  1/1000 SS  |  ISO-1600


Also notice how just going that little bit lower helps to separate your subject from the sometimes distracting background just a bit more. I hope this post has at least inspired you to try getting down low more often!

I am leaving early next week for a wonderful safari to the Savute and Okavango Delta regions of Botswana...and I am very excited!

So, until I return with more wonderful stories, photos and tips from the bush - keep well and keep clicking!


Morkel Erasmus 

Monday, 22 November 2010

The frustrating magic of panning shots

Well, as promised, a lengthier, hopefully pithier, blog post...


You've seen them, right? Those blurry shots of birds flying or animals running with just the exact amount of sharpness on the eyes or face or head to make it work beautifully. Those shots which look "Photoshopped" but after investigation you find out it was all achieved using in-camera settings and specific techniques...


"Ground Squirrel Rocket"
f14  //  1/50 SS  //  ISO-200


Monday, 1 November 2010

PhotoShare: Backlit Meerkats

Time for a quick PhotoShare everyone...


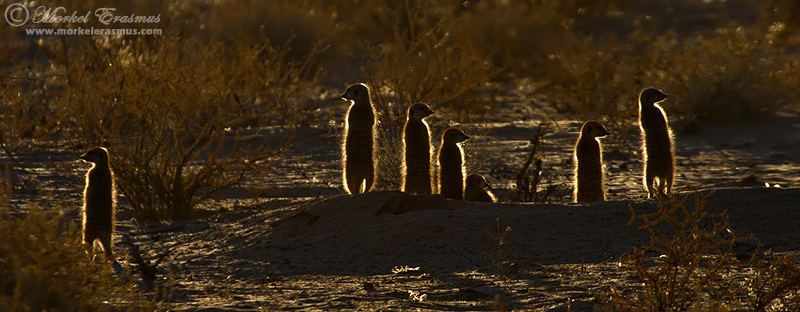
This troop of Meerkats (Suricates) were taking in the early morning sun in the Kgalagadi Transfrontier Park (Kalahari desert) during our last trip in October 2010.


With the sun coming from directly in front of me, I used the light direction to create a rim-lit effect, with the sun nicely enhancing their outlines by shining through their fur. When doing this, it is necessary to underexpose considerably by dialing down your exposure compensation.


f8.0  //  1/2500 SS  //  ISO-640  //  Exposure bias -1


Enjoy the week ahead!


Morkel Erasmus